Google Slides
Screenshots
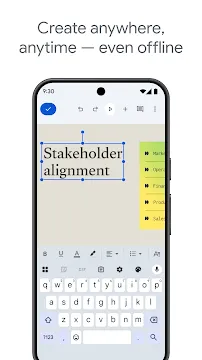
Google Slides for Android lets you create and edit presentations directly from your phone or tablet. It provides a simple way to build slide decks without needing a computer. You can start a new project from scratch or open a file someone else sent to you. The app works well for students, teachers, and office workers who need to work while moving around.
This app syncs your work across all your devices automatically. If you start a slide on your phone during a commute, you can finish it on your laptop later. You do not need to worry about saving your progress manually because the cloud handles it instantly. This makes the app a reliable tool for anyone who wants to stay productive outside of a traditional office setting.
How to Download And Install Google Slides APK for Android
Google Slides allows you to create, edit, and collaborate on presentations directly from your phone or tablet. If you cannot access the official app store or prefer a manual installation, downloading the APK file is a reliable alternative. This guide explains how to safely acquire and install the app to keep your projects moving.
Why Choose the APK Installation Method?
Most users download apps through standard stores. However, several situations make the APK version a better choice:
- Accessing Specific Versions: You might need an older version of the app if your device uses an outdated operating system.
- Bypassing Regional Restrictions: Sometimes certain app updates roll out in specific countries first.
- Managing Devices Without Stores: Some specialized Android devices do not come with pre-installed app marketplaces.
Step 1: Prepare Your Android Device
Android security settings usually block installations from unknown sources to protect your phone. You must change this setting before you begin the download.
- Open the Settings menu on your Android device.
- Scroll down and tap on Security or Privacy.
- Look for the option labeled Install Unknown Apps or Unknown Sources.
- Select the browser you plan to use (like Firefox) and toggle the switch to Allow.
By doing this, you give your browser permission to handle the installation file.
Step 2: Download the Google Slides APK File
Once your settings are ready, you need to find the installation file. Follow these steps carefully:
- Open your mobile browser.
- Visit Filetomob.com.
- Search for “Google Slides APK Download”.
- Navigate to the app page.
- Check the file details to ensure it matches your device architecture.
- Click the Download button.
- Wait for the progress bar to finish. A notification will appear once the download completes.
Step 3: Install the Application
Now that the file sits in your storage, you must run the installer.
- Open your File Manager app.
- Navigate to the Downloads folder.
- Tap on the file named Google Slides APK.
- A prompt will appear asking if you want to install the application.
- Tap Install at the bottom of the screen.
- The system will process the files. This usually takes a few seconds.
- Once finished, tap Open to launch the app immediately or Done to close the installer.
Get Started with Google Slides on Your Android Device
You have successfully installed Google Slides on your Android phone or tablet. This app allows you to create, edit, and share presentations from anywhere. Follow this guide to navigate the app and start your first project with ease.
Signing In to Your Account
When you open the app for the first time, you must sign in. This step syncs your work across all your devices.
- Personal Accounts: Use your standard Gmail address to access your private files.
- Work or School Accounts: Use your professional credentials. These accounts often include extra collaboration features provided by your organization.
- Switching Accounts: If you have multiple profiles, tap your profile picture in the top right corner. You can jump between different accounts instantly without losing progress.
Once you log in, the app automatically loads your existing presentations from Google Drive. You do not need to manually import files if they are already in the cloud.
Navigating the Main Interface
The Google Slides interface is clean and easy to use. Knowing where everything sits will save you time.
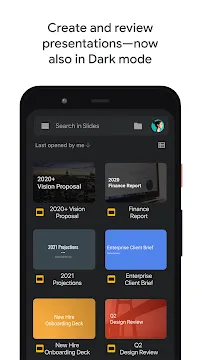
The Home Screen
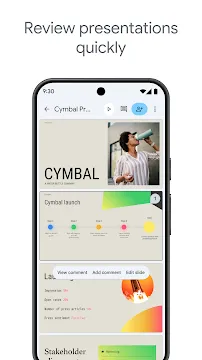
The main screen shows your Recent Files. This list helps you jump back into your latest work. You can change the view to a list or a grid using the icon at the top of the screen.
Sorting and Searching
At the top, you will find a search bar. Use it to find specific presentations by title. Next to the search bar, the folder icon allows you to browse files stored specifically on your device or in shared drives.
The “Plus” Button
Look for the large “+” icon in the bottom right corner. This is your primary tool for starting new work. When you tap it, you get two choices:
- Choose Template: Pick a pre-designed layout for pitches, photo albums, or reports.
- New Presentation: Start with a blank canvas to build your own design from scratch.
Essential Permissions to Grant
To get the most out of Google Slides, the app needs permission to access certain parts of your device. Granting these ensures the app runs smoothly.
- Storage Access: The app needs to read and write files on your device. This allows you to open local PowerPoint files and save presentations for offline use.
- Notifications: Enable this to stay updated. You will receive alerts when a teammate leaves a comment or shares a new deck with you.
- Camera and Microphone: You might want to take a photo and add it directly to a slide. The app needs camera access for this. Microphone access is useful if you use voice typing for speaker notes.
Creating Your First Slide
After you tap the “+” button, the editor opens. The center of the screen shows your current slide. At the bottom, you see a row of all the slides in your deck.
Adding Content
Tap the “+” icon at the top of the editor screen to add elements. You can insert:
- Text boxes for your titles and bullet points.
- Images from your gallery or camera.
- Shapes and lines to create diagrams.
- Comments to communicate with collaborators.
Changing Layouts
You do not have to move text boxes manually every time. Tap the “Layout” tool to change how content sits on the page. You can choose from title slides, section headers, or two-column layouts.
Sharing and Collaboration
One of the best parts of this app is working with others. Tap the Person icon at the top of the screen to invite people. You can set their access level to “Viewer,” “Commenter,” or “Editor.”
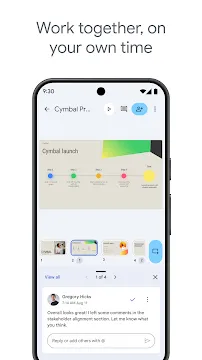
Because the app saves your changes automatically, you never have to worry about losing your work. Every edit you make appears for your teammates in real-time. This makes the app a reliable tool for group projects and business meetings.
Google Slides: Creating Your First Presentation
Google Slides on your Android device makes it easy to build presentations while you are on the move. You can turn your ideas into a professional slideshow with just a few taps. This guide will help you master the basics of the app quickly.
Starting Your First Presentation
When you open the Google Slides app, you will see a plus sign at the bottom of the screen. Tap this to begin. You have two main options to start your work:
- Starting from Scratch: Choose “New Presentation” to get a blank canvas. This is best if you want complete control over the layout. You start with a simple title slide and build everything yourself.
- Using a Template: Choose “Choose template” to see pre-made designs. Templates provide a shortcut. They include themed layouts for things like lesson plans, work profiles, or photo albums.
Using a template helps you save time. It handles the fonts and colors for you. However, starting from scratch gives you more freedom to be creative.
Managing Your Slides
A presentation is a collection of individual slides. You need to know how to organize them to tell a good story.
Adding New Slides
Look for the slide icon with a plus sign at the bottom right. When you tap it, the app asks you to pick a layout. You might choose a “Title and Body” layout or a “Two Column” layout. Pick the one that fits your information best.
Reordering Your Slides
You might realize that your third slide actually belongs at the beginning. To fix this, long-press the slide thumbnail at the bottom of your screen. Once it lifts up, drag it to the new position. Drop it where you want it to stay.
Deleting Slides
If a slide no longer fits, you can remove it. Tap the slide thumbnail once to select it. Tap it again to see the options menu. Select “Delete” to remove it from your deck.
Naming and Saving Your Work
One of the best parts of using this app is the peace of mind regarding your progress.
Automatic Saving
You do not need to look for a “Save” button. Google Slides uses an autosave feature. Every time you type a word or move a picture, the app updates the file. These changes sync directly to your Google Drive. This means you can start a slide on your phone and finish it on a computer later.
Naming Your File
New files usually have the name “Untitled Presentation.” To change this, tap the three dots in the top corner. Tap on the title at the top of the menu. Type a clear, short name for your project. This makes it much easier to find your work in your Drive folder later.
Customizing the Look
You want your presentation to look attractive. You can change the visual style by adjusting themes and backgrounds.
Choosing Theme Colors
Themes change the look of your entire presentation at once. To change a theme, tap the three dots and select “Change theme.” You will see a list of styles. Some are dark and professional, while others are bright and bold. When you pick one, the app applies those colors and fonts to every slide.
Changing Backgrounds
If you want to change just one slide, you can modify the background. You can choose a solid color or an image.
- Tap an empty area on a slide.
- Select “Change Background.”
- Pick a color from the palette.
- Tap “Done” to apply the change.
Tips for Success
- Keep it Simple: Use short bullet points rather than long paragraphs.
- Stay Consistent: Stick to one or two fonts so your slides look neat.
- Check Your Work: Use the “Present” button at the top to see how your slides look in full-screen mode.
By following these steps, you can create a high-quality presentation directly from your Android phone. The app is simple to use but offers all the tools you need for a great result.
Google Slides: Advanced Editing Guide
You can create professional presentations right from your phone. Many people think the mobile app only handles basic tasks. However, Google Slides on Android offers several advanced tools. You can polish your deck while on the train or waiting for a meeting. This guide shows you how to use these features to make your slides look sharp.
Organize Your Ideas with Lists
Clear lists help your audience follow your points. You should use them to break up heavy text.
- Create a List: Tap a text box and look for the Paragraph icon in the top toolbar. You can choose between dots or numbers.
- Change the Style: You do not have to settle for basic circles. Long-press the bullet icon to see different shapes like squares or arrows.
- Manage Levels: Sometimes you need a sub-point. Use the Indent buttons to move text to the right. This creates a nested list that looks organized.
- Spacing Tricks: If your list looks cramped, go to the text formatting menu. Adjust the line spacing to add “breathing room” between your items.
Make Titles Pop with Word Art
Standard fonts sometimes lack impact. Word Art allows you to create titles that grab attention.
- Tap the Plus (+) icon at the top of your screen.
- Select Text.
- Type your heading and then highlight it.
- Open the Format menu (the “A” with lines).
- Change the Border Color and Weight. This adds an outline to your letters.
- Adjust the Fill Color to a gradient or a bold shade.
By layering these styles, you create a custom look. This makes your presentation feel unique and hand-crafted.
Present Data with Tables and Charts
Numbers tell a story better when they are visual. You can add these elements directly on your Android device.
To add a Table, tap the Plus (+) button and choose Table. You can select the number of rows and columns immediately. Once the table appears, tap a cell to type. You can drag the borders to resize columns. If you need more space, use the toolbar to add rows or delete empty ones.
For Charts, the mobile app allows you to view and move existing charts easily. If you need to edit data, you will usually link to a Google Sheet. However, you can resize and reposition these charts to fit your layout perfectly. Always keep your charts simple so they remain readable on small screens.
Use Professional Slide Transitions
Transitions keep your audience engaged. They move the viewer from one idea to the next smoothly. While the Android app has fewer options than the desktop version, the available ones are effective.
- Select a Slide: Tap the slide thumbnail at the bottom of the screen.
- Find Transitions: Tap the three dots in the corner and look for Transition.
- Choose an Effect: You can pick “Dissolve,” “Fade,” or “Slide from right.”
- Apply to All: If you want a consistent look, choose the option to apply that transition to the entire deck.
Avoid using too many different effects. Stick to one style to keep your presentation looking professional.
Manage Your Speech with Speaker Notes
Great presenters do not read from their slides. They use notes to stay on track. You can write and view these notes privately on your Android device.
To add a note, tap the three dots in the top right corner. Select Show speaker notes. A small box appears at the bottom of the slide. Type your key talking points here. When you present your screen to a larger monitor, your notes stay hidden on your phone. This lets you look at your cues while the audience only sees your beautiful slides.
Quick Tips for Mobile Editing
- Use Undo: If you make a mistake, tap the curved arrow at the top.
- Group Objects: Select multiple items by holding one and tapping others. This lets you move them as a single unit.
- Check Alignment: Use the red guides that appear when you move objects. These help you center your text and images perfectly.
By using these advanced features, you turn your Android phone into a creative tool. You no longer need a laptop to build a high-quality presentation. Start experimenting with these formatting tricks today.
Master Mobile Presentations with Google Slides on Android
You can lead a professional presentation without a bulky laptop. Your Android device holds all the tools you need to captivate an audience. Google Slides for Android allows you to present, engage, and manage your deck from the palm of your hand. Follow this guide to transform your phone or tablet into a professional presentation tool.
Launching Present Mode
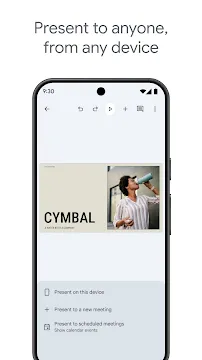
First, open your presentation in the Google Slides app. Look for the Play icon at the top of your screen. When you tap this button, the app offers several options. Choose Present on this device to start.
- Navigation: Swipe left or right on your screen to move through your slides.
- Speed: Manual swiping gives you total control over the timing of your talk.
- Fluidity: The app handles transitions smoothly, ensuring your visuals look crisp.
Connecting to a Larger Screen
Presenting on a small phone screen works for one-on-one meetings. However, larger groups require a bigger display. You can connect your Android device to a TV or projector using these three methods:
1. Google Chromecast
This is the easiest wireless method. Ensure your Android device and the Chromecast stay on the same Wi-Fi network. Tap the Cast icon within the Slides app. Select your TV from the list. Your slides will appear on the big screen while your phone acts as a remote.
2. Miracast and Wireless Display
Many modern smart TVs use Miracast technology. You do not need a separate dongle for this. Open your phone’s settings and look for Screen Cast or Wireless Display. Once you link the devices, your entire mobile screen mirrors onto the TV.
3. HDMI Cable Adapter
Wireless signals can sometimes fail in crowded buildings. Use a physical connection for maximum reliability. Most Android phones use a USB-C to HDMI adapter. Plug the adapter into your phone and run a standard HDMI cable to the projector. This setup provides a lag-free experience.
Using Pro Tools During Your Talk
Google Slides includes hidden features that make you look like a seasoned pro. You do not need a physical clicker or a laser pointer.
- Virtual Laser Pointer: Tap and hold any spot on your slide while presenting. A glowing red dot appears on the big screen. Move your finger to highlight specific data points or images.
- Speaker Notes: You do not have to memorize every word. Tap the Notes icon in the toolbar. Your phone will display your private scripts, but the audience will only see the slides on the main projector.
- Audience Q&A: This feature creates an interactive environment. Start a Q&A session to generate a short URL at the top of your slides. Audience members type this link into their own browsers to submit questions. You can see these questions on your phone and choose which ones to answer live.
Presenting via Video Calls
Modern work often happens remotely. You can present directly into a digital meeting using your Android device.
Google Meet Integration
If you join a Google Meet call on your phone, look for the Share Screen option. However, the Slides app often has a direct Present to Meeting button. This shares only the presentation window. It keeps your private notifications and messages hidden from the participants.
Zoom and Other Apps
For Zoom, use the Share button at the bottom of the call screen. Select Screen. Switch over to the Google Slides app and start your presentation. Remember to turn on “Do Not Disturb” mode on your Android device first. This prevents text messages from popping up while you are sharing your screen.
Best Practices for Mobile Success
- Battery Life: Presentations drain battery quickly. Always start with a full charge or keep a portable power bank nearby.
- Offline Access: Toggle the Available Offline switch for your file. This protects you if the venue has poor internet.
- Orientation: Most presentations use a landscape layout. Turn off your screen rotation lock so the app can fill the entire display.
Using your Android device for Google Slides simplifies your workflow. You can walk around the room, interact with your audience, and stay mobile. This flexibility helps you deliver a more energetic and focused performance.